pinkstuff1.jpg

Recipes Index

I like to cook. And I'm undaunted by the challenge of cooking for folks with restricted diets for reasons of celiac disease, digestive intolerances or allergies. Some of my favorite recipes are housed here-- feel free to poke around and see what looks good!

Posts in Soup-Salads-Appetizers
Bill Granger's Corn Fritters (low FODMAP version)
 

This is a recipe I’ve been making for over 20 (!) years, after first tasting them at a restaurant called Bill’s in Sydney Australia. The Bill of Bill’s is Bill Granger, an internationally-loved chef and author of multiple cookbooks, in which different versions of this recipe make cameos. This is a gluten-free, dairy-free and low FODMAP version that I make for potlucks, Friendsgivings and whenever I need a scalable, cheap and easy crowd-pleasing dish to share.


Bill Granger’s Corn Fritters (low FODMAP version)

Ingredients:

  • 1 cup gluten-free 1-to-1 flour (I use Bob’s Red Mill brand)

  • ¼ tsp baking powder

  • ½ tsp sea salt

  • 1 tsp ground coriander

  • ½ tsp ground cumin

  • 1 tsp sweet paprika

  • 1 egg, lightly beaten

  • 1 tsp lemon juice

  • 3 cups frozen corn kernels, thawed

  • 4 spring onions, greens only, thinly sliced

  • 3 tbsp chopped cilantro

  • Olive or canola oil for frying

Directions:

  1. Place the flour, baking powder, salt, coriander, cumin and paprika in a bowl.

  2. Add the egg, lemon juice and 1/2 cup of water and beat to a smooth batter

  3. Add the corn, spring onion and chopped cilantro and stir to combine

  4. Heat the oil in a frying pan over a medium heat and spoon in ~2 heaping TBSP of the mixture for each fritter once oil is hot. Flatten with a spatula and cook for 2 minutes per side until golden and cooked through. Repeat with the remaining mixture.

  5. Taste for salt; sprinkle cooked fritters with additional salt to taste if needed.

While these fritters are deelish all by themselves, you can also serve them alongside a dip or condiment of your choice. In summer, a mango salsa would be lovely. In winter, a creme fraiche might hit the spot. A spicy condiment— a harissa or sriracha mayo— would not be out of place atop these gorgeous golden fritters either.

Click here to return to Recipe home

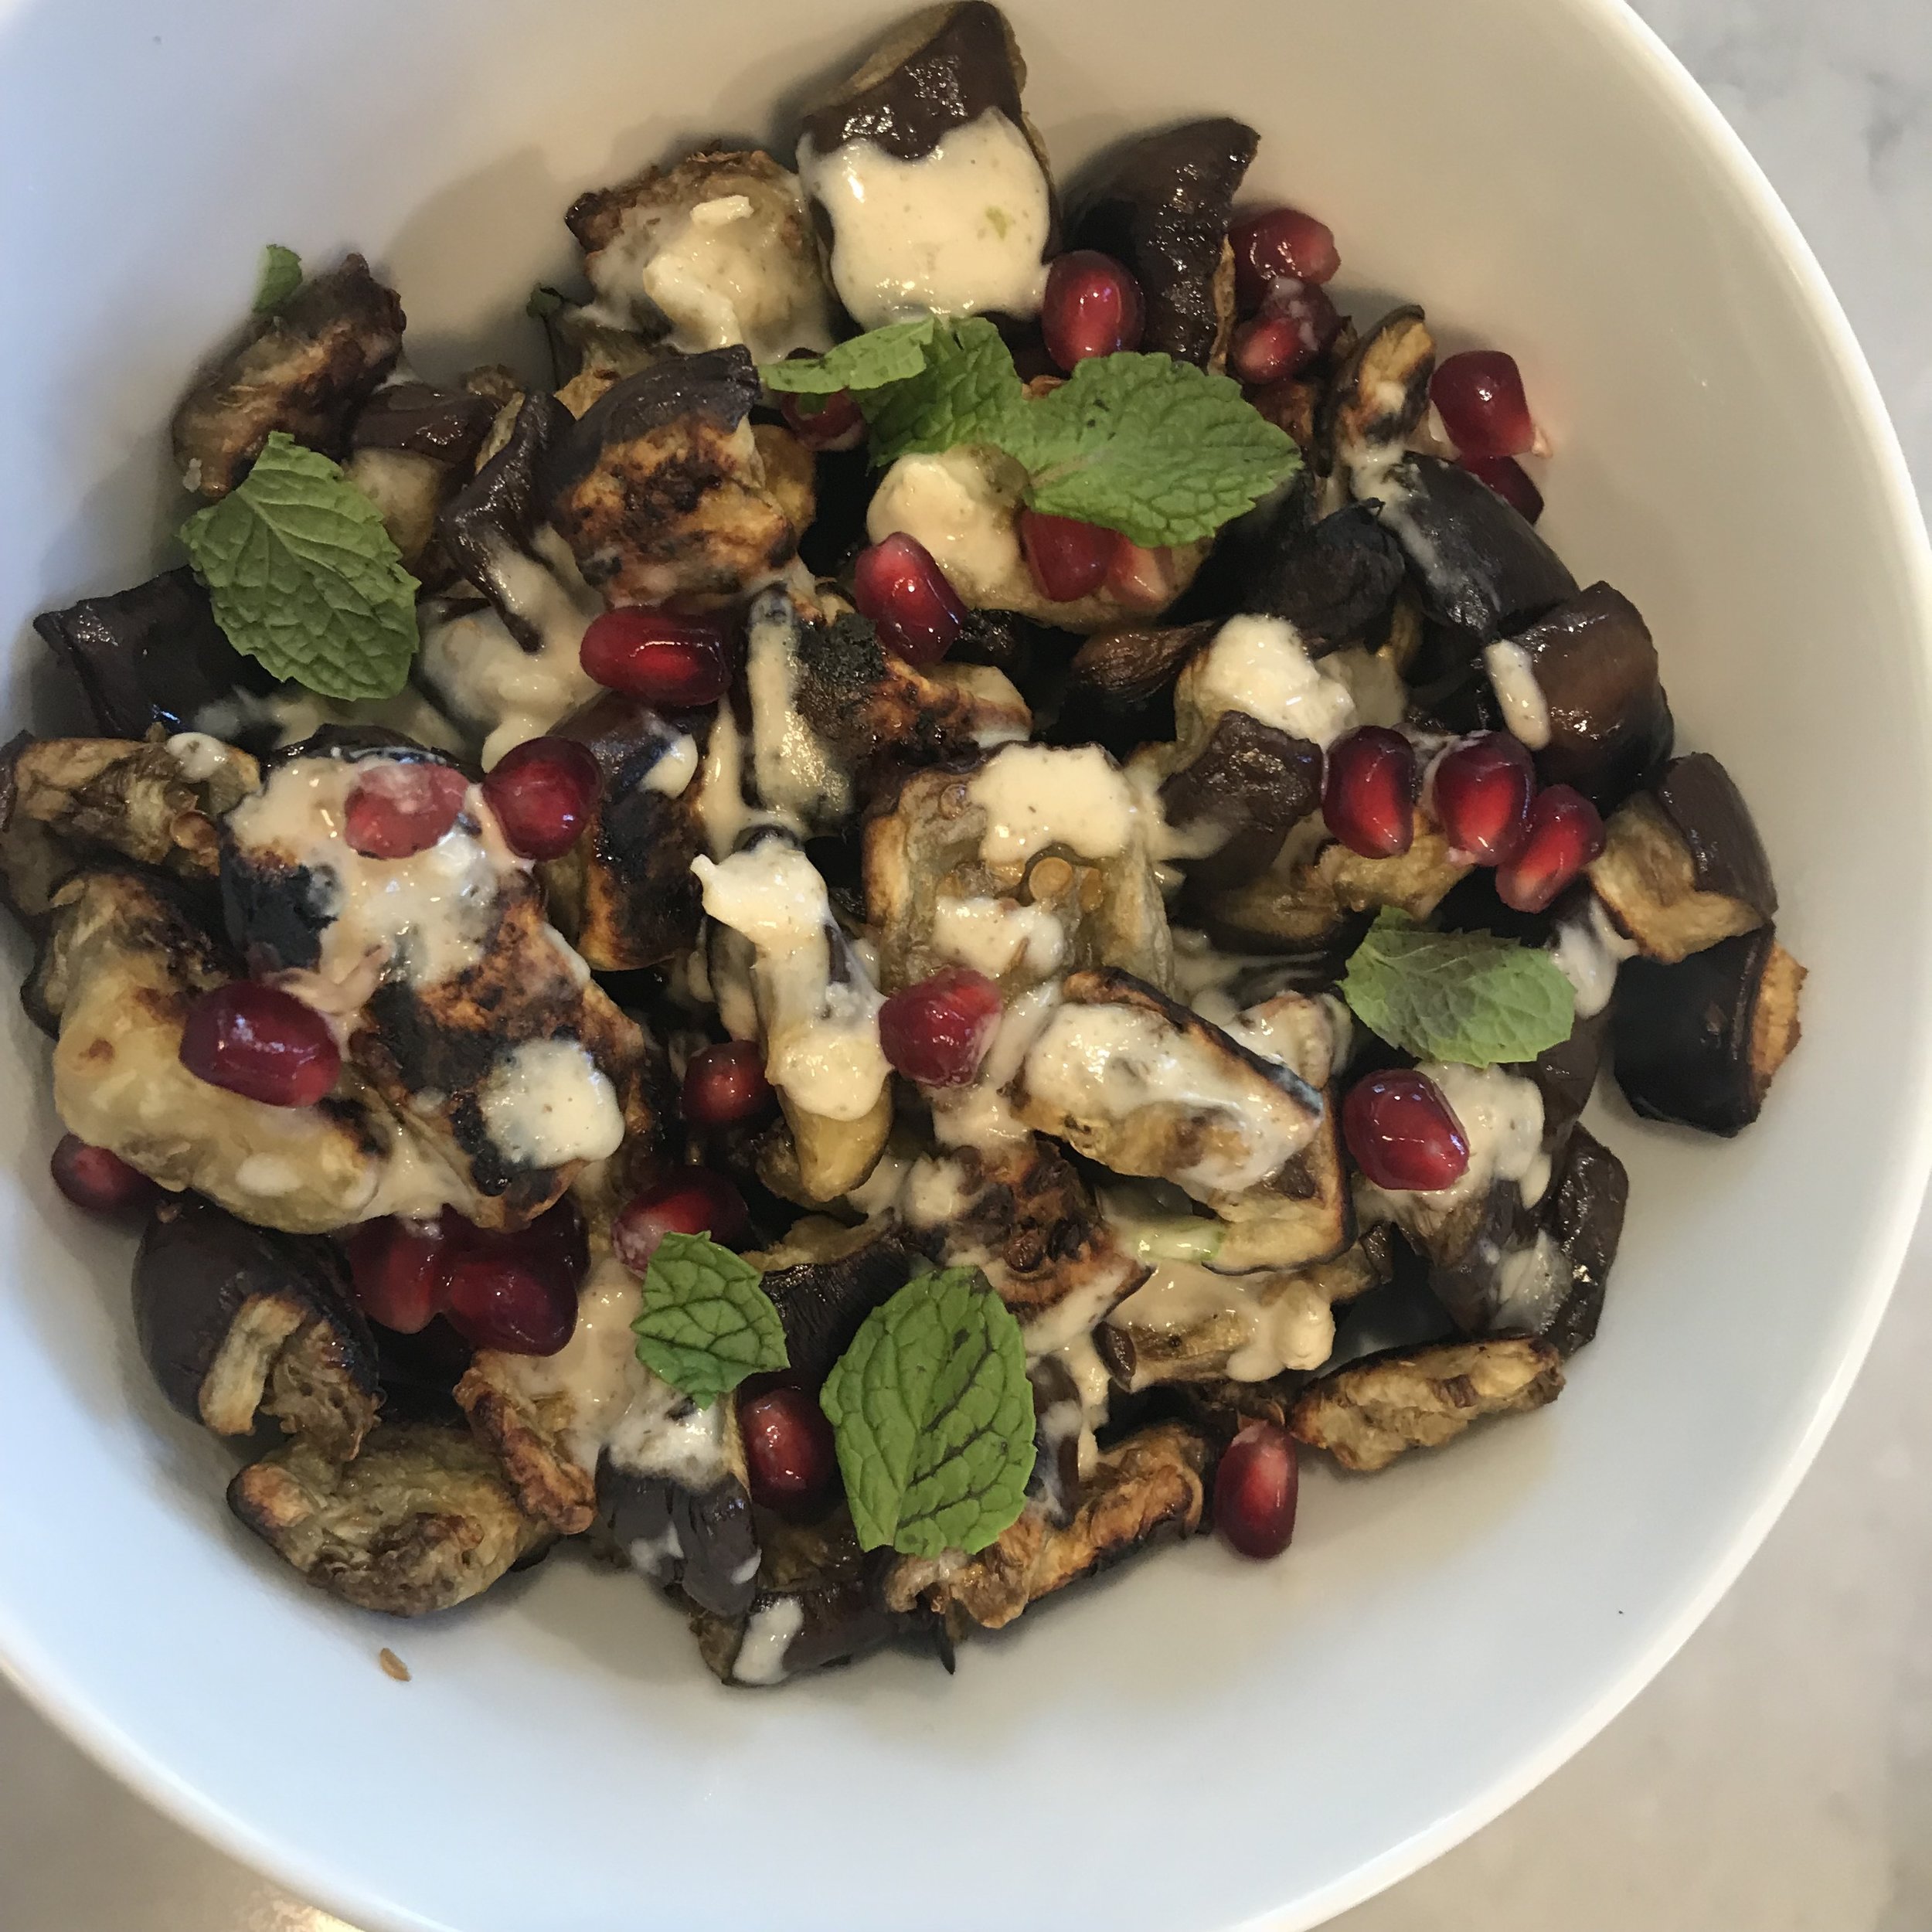
Roasted Eggplant with Tahini and Pomegranate
 

While the rhythms of our social life signal fall, the Farmer's markets and backyard gardens alike are still sending off summery signals, and one of them is a bounty of eggplant.  

I came late to the eggplant game, having decided at some point in childhood or early adulthood that I didn't like it.  It was only after being invited to a dinner party at the home of a vegetarian of Iraqi descent did I realize that I liked eggplant.  A lot. At least, I liked eggplant the way he made it.

This recipe is a little bit inspired by my friend Amos and a little bit inspired by the flavors of the great vegetarian chef, Yotam Ottolenghi.  It's total Mediterranean diet fare, and perfect for this time of year, when eggplants are abundantly available and pomegranates are just starting to show up in the supermarket.

This recipe is naturally gluten-free, dairy-free/vegan and can be easily adjusted to be low FODMAP as described in the directions below,

Roasted Eggplant with Tahini and Pomegranate

Ingredients: 

  • 1 medium/large eggplant
  • Olive oil
  • 1/4 cup tahini paste
  • 1/2 tsp ground cumin
  • 1/4 tsp kosher salt
  • 1 TBSP lemon juice
  • 1 medium garlic clove, minced or crushed (omit to make the recipe low FODMAP)
  • Hot water
  • Garnishes (optional but highly recommended): cilantro, parsley, fresh mint leaves and/or pomegranate seeds***

Directions:

  1.  Pre-heat oven to 425 degrees farenheit and line 2 large baking trays with parchment paper
  2.  Prep eggplant for roasting as follows:
    • Peel if you dislike the skin (or find it difficult to tolerate digestively).  Otherwise, leave the skin on.
    • Cut eggplant into 1" cubes
    • Arrange eggplant cubes on a paper towel lined plate (choose dye-free paper towels), sprinkle lightly with kosher salt, and microwave on high for about 5-8 minutes or until cubes are shriveled to about half their original size. (This will help reduce the eggplant's absorptive capacity so it doesn't sop up all the roasting oil and get greasy.)
  3. Remove the shriveled eggplant from microwave and transfer them to the parchment lined baking trays.  Drizzle enough olive oil on each tray to coat the cubes lightly and toss gently with your hands to disperse the oil evenly.
  4. Roast eggplant in the oven for 14-18 minutes, or until cubes are soft and some have begun to caramelize. (Toss the pieces after 7-8 minutes to help ensure even browning.)
  5. Meanwhile, while the eggplant is roasting, prepare the tahini sauce as follows:
    • Combine tahini paste in a small bowl with the lemon juice, cumin, salt and garlic***  Stir all ingredients to combine.
    • Start adding hot water 1 TBSP at a time, mixing as you go, to thin the the tahini mixture into a drizzly sauce.  
  6. Drizzle tahini sauce on roasted eggplant cubes, top with garnishes and serve.

***Note: To make low FODMAP, omit the garlic.  You can replace it with 1 TBSP garlic infused olive oil for the flavor without the FODMAPs if you wish.  Up to 1/4 cup of pomegranate seeds is considered a low FODMAP serving.  

Click here to return to Recipe home
Goat's Milk Labneh Dip
 

Goat's Milk Labneh Dip (image T.Freuman)

Labneh is a thick, creamy Middle Eastern yogurt dip, traditionally topped with a pool of olive oil and heavy sprinkle of za’atar– a green herbal mixture that features some combination of thyme, hyssop, oregano and/or marjoram with sesame seed and salt.  (Some versions also contain sumac.) Alongside better-known mezze staples like hummus and babaganoush, labneh makes a delicious topping for pita bread or–in our case– gluten-free alternatives.  

Labneh is hard to find in stores, even here in the New York area.  So when my mother-in-law showed up here with a huge vat of it–that she made herself (!!)– I naturally started plying her for the recipe. As it turns out, making homemade Labneh is so ridiculously easy that she didn’t even have a recipe.

Goat's Milk Labneh Dip

Directions:

  1. Line a sieve or fine strainer with cheesecloth, a thin tea towel or two layers of paper towels.
  2. Place it over a large pot.
  3. Dump a 32 oz container of plain, whole milk goat's milk yogurt* in it (you can use Cow's milk or Lactose-free cow's milk yogurt as well)
  4. Leave it out at room temperature for 2 hours.
  5. Remove and discard the liquid from the pot.  Refrigerate the strained yogurt until it is cold again.
  6. To serve: Spread onto a serving plate. Top with a pool of high-quality olive oil (fancy ones are great here, as you will really taste the nuanced flavors… a nice, green grassy one will be LOVELY).  Sprinkle generously with Za’atar, which you will need to buy at a specialty shop or online.  You can find it in supermarkets with a large selection of imported food products from Israel or the Middle East, at ethnic specialty markets like Kalustyan’s in New York City, or online.  This dish makes a great appetizer, or a fabulous, savory breakfast spread.

I made mine with plain goat's milk yogurt, which is lower lactose than cow's milk yogurt... and lower still after straining even more liquid from it; after draining for two hours, about 1/3 cup of liquid had seeped through the paper towels into my pot.  I think goat's milk yogurt gives a hint of the signature, musky twang of goat cheese that I love. You can use lactose-free cow's milk yogurt (Green Valley Organics) if you need to be sure your Labneh is fully lactose-free.

Click here to return to Recipe home

Bok Choy Salad with Peanut Vinaigrette
 

Bok Choy Salad with Peanut Vinaigrette (image T. Freuman)

I don’t know about the rest of you, but I completely overdid it this past Thanksgiving weekend.

I’m in serious reining it in mode, and have committed to low carb, vegetably dinners for this coming week– salads and vegetable soups.  Which means I’ve made a big batch of the only salad I could possibly stand to eat for a week straight: the crunchiest, most flavorful, packed-full-of-goodies salad I know. In case you haven’t met it yet, allow me to introduce you to this surprising Bok Choy Salad with Peanut Vinaigrette.

My mom once got the recipe from her friend, and we’ve been making it for years.  Over time, we’ve modified the dressing recipe to be waaaaay less sugary, and the salad is no worse for the wear.  This salad is a less common way to use bok choy, a most nutritious cruciferous vegetable that’s more likely to be stir fried or sauteed than it is to be eaten raw.  Which is odd, since raw bok choy beats most lettuces for crunch, but isn’t excessively tough and fibrous like raw kale and cabbage often are.  You can also use this vegetable salad as a base for proteins to add a bit more substance; some sauteed shrimp or chicken would be lovely, as would soy-marinated sliced steak or Asian- flavored baked tofu or tempeh.

Folks whose digestive systems disagree with the other cruciferous family veggies– like broccoli, brussels, kale and cabbage– may find that bok choy is the distant relative who they can tolerate.

Bok Choy Salad with Peanut Vinaigrette

Ingredients:

  • 2 bunches bok choy (or 4 bunches baby bok choy), chopped
  • 4 scallions (greens only for low FODMAP), thinly sliced
  • Dried cranberries (amount to taste; a 5oz package is not unreasonable)
  • Sunflower seeds (amount to taste)
  • Toasted slivered almonds or sliced almonds (amount to taste)

Toss together all of the salad ingredients.

Peanut Vinaigrette:

To make the vinaigrette, whisk together the following ingredients very well until uniform consistency.  Leftover dressing can be stored in a sealed container in the fridge, and brought to room temperature again for future use.

  • 1/2 cup olive oil (replace half with garlic-infused olive oil if making this low FODMAP)
  • 1/2 cup white vinegar
  • 1/4 cup sugar
  • 2 TBSP soy sauce (can use gluten free Tamari soy sauce to make this gluten-free)
  • 2 TBSP crushed garlic (omit this ingredient if making low FODMAP)
  • 2 TBSP smooth peanut butter
  • dash of salt and pepper to taste

Click here to return to Recipe home

Roasted Maitake Mushrooms
 

(image T. Freuman)

I’ll be the first to confess that elaborate mushrooms scare me a bit. The otherworldliness of enokis, the meatiness of King Trumpet stalks, the sponge-like texture of Lion’s Manes.

But I’ve been served Hen of the Woods enough at high-end restaurants to know that something delicious would await me if I could just bring myself to push past the awkwardness of our first face-to-face kitchen encounter. So I did. And I’m glad.

If the name Hen of the Woods doesn’t sound familiar, perhaps you’ve encountered this mushroom elsewhere under its Japanese name, Maitake? Maitakes get a lot of good press for their high antioxidant content, and they’ve even shown promise as a food with cancer-preventive potential.

We’re going to skate past the question of “why” to roast Hen of the Woods mushrooms, because the answer is quite obvious. In short:

  • They’re a delicious umami bomb
  • They make mundane foods like polenta, plain pasta, mashed potatoes or burgers extremely fancy
  • They’re insanely nutritious and are a part of your balanced, inflammation-taming, disease-preventing diet
  • You’re getting sick of roasting cauliflower

Now: Hen of the Woods mushrooms grow in a log-like cluster (below, top) that can be a bit intimidating. But once you approach the cluster with a knife, you can cut off little florets that have such a strong resemblance to cauliflower, that you’ll feel comfortable in no time (below, bottom).  As you take apart the mass of mushrooms into smaller florets, use your finger or a paper towel to dust off any little clusters of dirt embedded among the stalks.


Once you have the mushroom cluster cut down into florets, the rest is a cinch. Toss the florets in olive oil to lightly coat and sprinkle with salt. Arrange on a parchment paper lined baking tray. Roast in a 425 degree oven. Check on them after 10 minutes; smaller pieces may already be crisp on the edges. Remove these from the tray and put the tray back in the oven for another 3-5 minutes to get the larger pieces a little bit crispier. Remove from oven and serve!

Pao de Quejo (Brazilian Cheese Buns)
 

Loosely translated, Pan de Yuca means "God loves Celiacs and wants us to be happy."  Pao de Quejo (Brazilian Cheese Buns) (image T. Freuman)  

Don't you just want to cuddle up with this cute, fuzzy Taro?

Cassava (aka: Yuca, Manioc), Ñame (Caribbean Yam), Yautia (aka Taro), Batata (aka Boniato, or Sweet potato)… if you haven’t come across these staple root vegetables of Hispanic and Caribbean cuisines, what better time than autumn, when roasted roots and chunky stews take front and center?

I was formally introduced to my Hispanic roots when I had the opportunity to take a tour of NYC’s historic Essex Street Market with Lorena Drago, a fabulous dietitian, author and diabetes educator. Lorena opened my eyes to the wide, wonderful world of starchy root vegetables that hail from the southern hemisphere.  Cooked, these root veggies would generally take the place of a potato or serving of cooked grains as the carbohydrate in your perfectly-balanced plate.  Generally, these root veggies are good-to-excellent sources of potassium (which helps lower blood pressure, especially in conjunction with a reduced sodium diet) and Vitamin C; and while not extremely high in fiber, will have more fiber than a calorically-equivalent portion of white OR brown rice, which makes them a nutritious substitute. 

If you’re ready to get in touch with your Hispanic roots, consider this:

  • Yautia (Taro) should be relieved of its thick and sometimes hairy peel (not unlike that of a coconut) before cooking; Drago describes its flavor as sort of a “combination of artichoke heart and boiled chestnuts.”  Um…hello?  Could that possibly sound more appealing?  
  • Ñame is probably the most nutritious of the bunch; it’s the highest in fiber (1/2 cup serving has 3g fiber and counts as 1 starch exchange) and is loaded with potassium, vitamin C and Vitamin B6, which makes this Caribbean version of the yam resemble a banana more than a conventional American sweet potato, nutritionally speaking.  Drago describes the flavor as a “slightly sweet, smoky baking potato” with a texture that is “softer and lighter” than a typical yam.
  • Batata (Boniato) is a Caribbean sweet potato very popular in Cuban cuisine.  It sort of resembles a typical sweet potato on the outside but tastes more chestnutty than overtly sweet and squashy like the sweet potatoes you’re probably used to.  You can use it as a substitute for conventional potatoes in all the usual ways.
  • Yuca (Cassava, Manioc) is generally eaten boiled or fried, but must always be peeled before eating!  Baked yucca “fries” are a nice compromise; they’re more fibrous than potatoes, and therefore offer a nice textural change from the ordinary. 

Equally interesting to me is the role of flour derived from cassava/yuca (which you’re probably more familiar with under its alias of Tapioca Flour) in traditional (gluten-free) breads and rolls.

Casabe is a crispy, crackery Latin American flatbread made from Cassava flour; look for it in the Hispanic food aisle of your local supermarket; it’s usually sold wrapped in paper.  And then there is Pan de Yuca, which goes by many different names depending on the country, but is essentially a tapioca flour-based cheese roll. They are beyond easy (and fast) to make, and have a wonderful savory, chewy appeal when served hot from the oven.  While they get hard as rocks after a day or so of baking, they are easily revived to their soft, chewy selves with a quint stint in the microwave, and are versatile enough to accessorize breakfasts and dinners alike.  Stale rolls could also be cubed, toasted and stored in an airtight container to be used as a gluten-free crouton or possible base for an upcoming gluten-free Thanksgiving stuffing. Using lactose-free milk and a nice, mature hard cheese like Parmesan will keep these rolls virtually lactose-free, if that’s also a concern.

Pão de Queijo- Brazilian Cheese Buns

Ingredients:

  • 1/2 cup lowfat milk (use lactose free or your favorite milk alternative as desired)
  • 2 TBSP olive oil
  • 1/4 tsp salt
  • 2 1/4 cups tapioca flour (aka Cassava flour)
  • 2 eggs
  • 1/2 cup grated Parmesan cheese

Directions:

  1. Bring the milk, oil and salt to a boil
  2. Remove from heat.  Slowly combine half of the tapioca flour into the liquid mixture.  (It won’t all absorb at this point.)
  3. Add the eggs one at a time, each followed by half of the remaining flour, and mix into a well-combined batter, which will be thick, gummy and somewhat difficult to stir.  Do your best.
  4. Using your hands, mix the cheese into batter, kneading until well incorporated.
  5. Using wet hands, roll the dough into golf-ball-sized balls; this quantity of batter should yield 15 rolls.
  6. Bake for ~15 minutes at 375 degrees , or until rolls are puffy and golden brown on top.
  7. Serve immediately; they taste the best when hot!

Click here to return to Recipe home

Gluten Free Mushroom “Barley” Soup
 

Gluten Free Mushroom “Barley” Soup (image T. Freuman)

Nothing heralds soup season like an early Noreaster, and the cold, rainy assault of ghastly unpleasantness it brings with it.

In weather like that, I miss barley.  More specifically, I miss me a bowl of warming, filling and comforting mushroom barley soup in all of its earthy, satisfying glory.  I’ve come to terms with the fact that wheat has gluten, but et tu, barley?

As fate would have it, I was walking through a health food store last weekend and I spotted an unusual vaccuum-packed bag of some strangely named grain-looking product called “Job’s Tears.”  Immediately, I notice this grain looks exactly like pearled barley. I read the label.  It reveals frustratingly little about this unusually-named food, except to confirm that it is, indeed a grain.  From Japan.  And it is best used to add some heft to slow-cooking soups.  Cautiously optimistic (I’ve been hurt by grains before), I buy these so-called Job’s Tears and promptly return home to start the research.

My own eyes welled up with tears when the grain list on the Celiac Sprue Foundation website confirmed what I had been hoping: the grain called “Job’s Tears”  (aka: Coix seed, Hato Mugi, or Adlay) is not only gluten-free, but it serves as a perfect substitute for pearled barley in recipes.

What are Job’s Tears and where can I buy them?

Job’s Tears, like other cereal grains, is a grass. In this case, it is a tropical grass native to parts of Asia (but since transplanted to some parts of the U.S.) that got its nickname from the tear-like shape of the grain it produces.  The ones I bought are white, meaning that they have already been hulled.  Apparently, however, one can readily find the brown (unhulled) version sold in Japan. Your best bet to find them in-store would be an Asian supermarket. Otherwise, look online.

Pearled barley (top left) cooks up to look just like Job's Tears (bottom right)

Gluten Free Mushroom "Barley" Soup 

Serves 4. Double the recipe if you wish.

Ingredients:

  • 2 TBSP olive oil
  • 1 1/4 lbs mixed mushrooms of your choice, stems removed and reserved and caps sliced (For reasons of economy, I use mostly cremini or button and then top them off with a few exotic species for sex appeal.  Adding some reconstituted dried shiitakes adds nice texture, too.)
  • 5 cups cold water if using barley, 6 cups if using Job’s Tears
  • 1/4 cup white wine
  • 1 onion, chopped
  • 1 celery stalk, chopped
  • 1 carrot, chopped
  • 1 tsp dried thyme leaves
  • 1 bay leaf
  • 1 tsp kosher salt
  • 1/4 tsp black pepper
  • 3/4 cup Job’s Tears (gluten-free) OR 1/2 cup pearled barley (gluten-full)
  • 2 tsp balsamic or red wine vinegar
  • 1 tsp minced fresh garlic

Directions:

  1. Heat 1 TBSP oil in a soup pot over medium heat.  Add mushroom stems and sweat 5 minutes until soft and releasing liquid.
  2. Add water and wine and bring mixture to boil.  Reduce heat, cover, simmer for 20 minutes.  Fish out the stems with a slotted spoon and set the stock aside in a separate pot.
  3. Using the original soup pot, heat remaining 1 TBSP oil.  Add onion, celery and carrot and sweat until soft, 4 minutes or so.
  4. Add thyme, bay leaf, salt and pepper.  Stir to coat veggies.
  5. Add sliced mushroom caps and saute 5 minutes until soft and releasing liquid.
  6. Add the stock and the Job’s Tears OR barley.  Bring to boil, reduce heat, simmer for 1 hour until the grain is tender.
  7. Remove from heat and stir in vinegar and garlic.
  8. Fish out the bay leaf and serve!

Click here to return to Recipe home

Grandma Esther’s Salmon Croquettes
 

Canned salmon cleans up real nice in grandma's famous croquettes (image T. Freuman)

I'd like to send some love to a heart-healthy pantry item that seems to get so little of it: canned salmon.

When I was young, my Grandma Esther used to make Salmon Croquettes–which are basically like crab cakes for the kosher set. My dad apparently loved them, though truth be told, I was never a huge fan. But I recently came across her old handwritten recipe, and decided that it was worth giving them a try with my more refined adult palate. And I’m glad I did! They were darn tasty: mild-flavored, with a slightly springy, pancake texture, in contrast to a more meaty texture that you’d expect from an actual salmon burger. They are a perfect brunchy, lunchy or light suppery food, and would go well on a bed of greens as the protein on a salad, or alone as an appetizer served with your favorite fancy mustard, gingery salad dressing, horseradish sauce or dill-infused condiment.

When my kids were 13-months old, I made this recipe for them and they loved it!  It’s a great way to serve fish to picky, carb-loving tots, since the texture is sort of cakey/bready/springy rather than meaty; cut up into bite-sized pieces, it looks like bread or pancake.  For babies, I’d recommend using boneless, skinless canned salmon to keep the texture smoother for safety’s sake.

If canned fish gives you the heebie jeebies, consider this: canned salmon is almost always from wild-caught salmon, which means it tends to have a higher content of heart-healthy omega-3 fatty acids. It's also a good non-dairy source of calcium, assuming you eat the teensy-tiny, wispy bones…which you can do without really even noticing it. (But take out the larger, more visible bones because they can be a choking hazard.)  If you’re squeamish about encountering the bones when you open the can, they do sell boneless, skinless canned salmon. Buy that and work your way up to the bone-in kind for the extra calcium. You’ll still get the omega-3 benefits, and no one will think any less of you for it. There’s more! wild canned salmon is lower in mercury and toxins like PCBs than even farmed salmon, (which is still reasonably low), placing it among the safer fish choices you can make for yourself, your kids, and the pregnant women in your life.

Are you feeling the love yet?

So in memory of my beloved Grandma Esther, I am sharing an updated version of her recipe, which is true to the original except for the part about cooking it in “deep hot fat” until golden brown. Oh, grandma. Deep, hot fat was so 20th century…

Grandma’s Salmon Croquettes

(Yield: 10 croquettes, which will be more crab-cake sized than burger-sized)

Ingredients:

  • 1 tall (15 oz) can pink salmon. Grandma wrote to “use everything but the bones”, meaning just pick out the large, visible bones and leave everything else.  (Alternatively, you can use two 6 oz cans of boneless, skinless salmon… it’s faster and works just as well.)
  • 1/2 cup low-fat buttermilk* or plain kefir (or other plain cultured yogurt drink)
  • 2 eggs, beaten
  • 1/2 cup flour or breadcrumbs (Preferably whole wheat;  you may use a gluten-free version of either if you’re avoiding wheat, as I did.)
  • 1/4 tsp baking soda
  • Salt and pepper
  • Olive or canola oil for cooking (amount will depend on size of your pan… I used 1 TBSP per batch of 3-4 croquettes in a non-stick pan and it worked fine.)

(* C’mon… who actually has buttermilk laying around the house? Here’s an easy substitute that I used: combine 1 TBSP lemon juice or vinegar with enough milk to make 1 cup total. Let sit for 5 minutes and then use as you would buttermilk.  Note this recipe only calls for half of this amount.)

Directions:

  1. Mix salmon, seasonings and eggs.
  2. Add buttermilk, flour/breadcrumbs and baking soda and stir until well-blended.
  3. In a non-stick pan, heat a small amount of oil (just enough to cover the cooking surface…~ 1.0-1.5 TBSP for a medium-sized pan) until nice and hot.
  4. Drop batter with a spoon and pan fry until bottom is golden brown; flip each croquette and cook second side for an additional minute or two until its firm and also nice and brown.
  5. Drain on a paper towel and serve.  Note: you can serve these hot, warm or cold.=


Click here to return to Recipe home

Sweet Potato Pignoli Picnic Quiches (FODMAP friendly)
 

Sweet Potato Picnic Quiches (FODMAP friendly) (image T. Freuman)

This tasty little recipe comes to us from Israel, via my cousin Shelly, who brought it to a family retreat over Memorial Day weekend.  It’s a great portable, vegetarian “entree” for summer picnics–as it can be served warm, room temperature or cold.

A digestive aside: while this recipe does feature dairy prominently, most of the cheeses used are low (or negligible) in lactose.  You can swap in Green Valley Organics Lactose Free sour cream* for the Greek yogurt to help keep lactose content to a minimum.  Once the lactose situation is sorted, you’ll notice that there are no other fermentable carb (FODMAP) ingredients in the mix– no onions, garlic, wheat, flour of any kind or gassy veggies.  So file this one away in the event you’re ever invited to a potluck attended by a digestively diverse crowd.

Sweet Potato Pignoli Picnic Quiches

Yield: ~16 mini quiches

Ingredients:

  • 14 oz sweet potatoes, grated
  • 6 oz mozzarella, grated
  • 3.5 oz Parmesan cheese, grated
  • 8 oz feta cheese, crumbled
  • 7 oz 0% plain Greek yogurt OR Green Valley Lactose Free Sour Cream*
  • 2 TBSP canola oil
  • 1/3 cup chopped fresh chives
  • 1/2 cup pine nuts (pignoli)
  • 4 eggs
  • Black pepper (to taste)

Directions:

  1. Preheat oven to 350 degrees
  2. Using non stick pan, toast pine nuts on stove top until just starting to turn golden brown and fragrant.  Remove from heat immediately and set aside.
  3. In a large bowl, combine grated sweet potato, mozzarella, Parmesan and feta.  Mix to combine.
  4. Add Greek yogurt or sour cream, canola oil, chives, toasted pine nuts and eggs.  Season with black pepper to taste.  (No need to add salt… these are well salted from the cheese already.)  Stir until all ingredients well combined.
  5. Spray standard-sized muffin tin with non-stick spray
  6. Pour batter into muffin tins and bake for 35-40 minutes until firm and turning golden.

* FTC disclosure: I am a paid consultant for Green Valley Organics Lactose Free

Click here to return to Recipe home

Mama Duker’s Cholent
 

After my twins were born, both my mom and my mother-in-law stocked our freezer with their own versions of cholent– the quintessential Jewish comfort food. Cholent is a hearty, stick-to-your-ribs, stew that was traditionally cooked overnight on Fridays and served for lunch on the Sabbath.  Most versions contain meat, potatoes, beans and barley, though the folks who cook for me replace barley with a gluten-free substitute like quinoa or millet. 

I guess they figured it was loaded with complex carbs, protein and iron to keep me nourished and energized, but would be easy enough to shovel in my face by the spoonful in between crying jags (both mine and the babies, naturally).

Cholent is decidedly heavy winter fare, though you can significantly reduce its fat content (which derives from the meat) by refrigerating finished cholent overnight and then skimming the solidified fat right off the top; besides, cholent that’s 1-2 days old tastes even better than fresh-from-the-oven.  Cholent is a pretty flexible dish and everyone’s grandmother makes it everso slightly differently: you can change proportions of beans, meat, potatoes to suit your taste, or according to what you have on hand.  (My MIL sometimes adds whole eggs in the shell to hers, which roast overnight.  She’s also been known to toss in some sweet potatoes.  It’s very hard to go wrong with this dish.)  The important thing is to cook your cholent for 6 to 8 hours, or even longer; anything less than that has no flavor.

My Mom’s Cholent

Ingredients:

  • 2 large onions, sliced
  • 1 lb. dried lima beans–more if you don’t use barley or a replacement grain(you can also mix in other kinds of dried beans, preferably medium to large ones.  Gigante beans come to mind as a delicious and buttery option.)
  • 3 to 4 lbs of flanken* (or if flanken is too pricey or unavailable, you can use any meaty bones plus about 3 lbs of stew meat, like chuck)
  • 2 or 3 cloves of garlic, sliced thin or chopped
  • 3 lbs of peeled potatoes (cut them in half if they are large)
  • 1 cup of barley (optional; substitute millet or quinoa to make gluten-free)
  • 1 bay leaf
  • Salt
  • Pepper
  • Paprika
  • Olive or canola oil for browning onions

* Flanken is a cut of meat similar to beef short ribs

Directions:

  1. Soak beans for several hours in cool water.  Drain well.
  2. Cut flanken into strips or chunks.  Sprinkle a little salt, pepper and paprika onto meat.
  3. In a large, heavy pot with cover, lightly brown the onions and garlic in oil.
  4. Add seasoned meat to onions/garlic.  Stir to brown it a bit for just a couple of minutes.
  5. Add beans, potatoes, bay leaf, barley (if you use it), and add enough water to cover everything. Stir it up so ingredients are well-distributed and mixed up nicely.
  6. Bring cholent to a boil on top of stove.
  7. Transfer pot to 200 degree oven and bake for 7 or 8 hours–or longer!  Check occasionally to add water if needed.  You want it nice and wet, but not watery or too soupy.
  8. Adjust flavors to taste; Serve with horseradish, mustard, or similar spicy condiments.

This reheats beautifully–and tastes better the second or third day. It freezes like a dream.

Click here to return to Recipe home

Curried Zucchini Soup
 

The Quintessential Soup for Locavores: Zucchini Curry soup at Moulin Brégeon (image T. Freuman)

Before I had children, I got to take a few vacations to France. That will obviously never happen again. But thankfully, on my last trip to the Loire Valley, I had the good sense to leave with a recipe so I could recreate some of the flavors of a fantastic culinary experience.

Chef Pascal gathering the garnishes for the soup from the front garden

The cuisine in the Loire Valley was simple and delicious, featuring locally-grown produce in season, like strawberries, cherries and zucchini.   Locally-grown mushrooms also played a starring role, and locally-caught pike perch (fish) and locally-made goat cheeses are ubiquitous.

While our meals were quite varied, the one dish that kept resurfacing was some version of a curried zucchini puree.  The most successful variation on the theme was a cold, pureed soup served by our lovely and talented hosts at Le Moulin Brégeonpossibly one of the most idyllic places on the planet. While I’ve never much been one for cold soups (or making soup in the summer), I must say that this dish won me over; it’s a lovely substitute for a salad to start off a summer meal, or would make a fine half of a light soup-and-salad lunch.

This recipe was graciously provided by Bernard at Moulin Bregeon.  After having tasted the cool soup, which was incredibly refreshing after a long, hot day of touring around the region, I expected the recipe to be a considerably more involved and nuanced affair than it turned out to be.  The actual process is astonishingly simple, and really highlights the difference that locally-grown, fresh ingredients make from a flavor perspective.  In our case, the zucchinis used for the soup were picked from the inn’s garden just 3 hours before dinner, and we watched Chef Pascal clip some chives and pansies for the garnish just moments before we were seated for dinner.  Bernard emphasized the importance of using small, younger zucchini for this recipe–about 6 oz each– rather than the monster-sized zucchini we’re used to buying in the U.S.   He also mentioned that the trick to the texture is really blending the soup until it is a very smooth and creamy with no chunks or visible pieces; this gives such a velvety and rich effect without using any cream whatsoever.  (If you've got a Vitamix, this should be a breeze.) For my vegan readers, I’m sure a vegetable broth would substitute just fine for the chicken broth.  While I’ve never much been one for cold soups (or making soup in the summer), I must say that this dish won me over; it’s a lovely substitute for a salad to start off a summer meal, or would make a fine half of a light soup-and-salad lunch.

Moulin Brégeon’s Curried Zucchini Soup

Serves 4

Ingredients:

  • One large, peeled onion cut fine
  • 2 tablespoons virgin olive oil
  • 2 teaspoons curry powder
  • 4 young zucchinis (~26 ounces total, or about 1.7 lbs), washed and cut in fine rounds
  • ~4 cups (1 liter) of chicken broth

Directions:

  1. Pour the oil in a big pot, throw in the onion, the curry and a pinch of salt. Brown until the onion is tender (3 or 4 minutes).
  2. Add broth and zucchinis, cover and reduce heat, cook for 20 minutes.
  3. Blend until the soup is creamy.
  4. You can eat this soup hot or cold; you can also add more curry if you like it spicier.
  5. Garnish with fresh chives if desired

Bon apétit!

Click here to return to Recipe home

Vegetarian Pozole
 

His 'n' her pozole (image T. Freuman)

I first encountered pozole at a small Mexican restaurant in Hell’s Kitchen, New York. It was a freezing cold day, much like today, in fact, and one of my friends ordered a preternaturally red, steaming, spicy bowl of pozole–or, Mexican pork and hominy stew. Big, hearty kernels of white hominy floated around in the bright red broth as lovely pieces of cilantro clung to them. The smell was divine. It was exactly what I was craving…except for the large hunk of pork-on-bone anchored right in the middle of the bowl.

I decided to find a vegetarian recipe that I could make at home, and came up empty. So I went about creating my own version, based partly on my memory of what was in that steaming bowl and partly on some of the many soups I had tasted when traveling around Puebla, Mexico, when I spent time studying there in graduate school.

My version lacks the shocking red color, which actually derives from a natural seed called called achiote (or annatto, in English). I left it out because it’s only there for color, not flavor, and unless your supermarket has a large Hispanic foods selection, it can be difficult to find. (You may recognize annatto from your natural cosmetics; it’s used to impart orange and red colors to lip balms, soaps and body washes.) We fake the achiote effect here by using the canned tomatoes with their juice.

Hominy is dried white corn that has been soaked in a basic (as in pH) solution, traditionally lime water, so that the hulls are removed from the kernels. In Mexican cuisine, you’ll see hominy mostly in soups, though it is also used to make tamale flour. In the U.S. south, you’ll also see hominy used to make grits. The big, soft kernels (which look like oversized soft corn nuts) help give this soup a hearty, substantial-ness that I find is lacking in some vegetable soups. (Of course, I’ve included beans and mushrooms for this same purpose.  What can I say?  I like soups that eat like a meal.)

Since pozole is a soup I crave in the cold, dead of winter, when the pickings can be slim as far as fresh, inexpensive and flavorful produce goes, I designed this recipe to take advantage of some pantry staples you can keep in the cupboards, supplemented with a just a few, key fresh ingredients. 

Depending on what’s available locally in your area, you can use fresh zucchini or chayote, which is a small, green-skinned, mild-flavored summer squash (well, it’s really a gourd, technically) that looks sort of like a quince or a pear. In my area, where there is a large Hispanic population, it’s cheaper and easier to find in winter than zucchini is, so I’ve offered it as an option for this recipe. If you can find it, try it! Chayote is super low-calorie and is a good source of Vitamin C, potassium, folate and fiber.

Lastly, don’t be put off by the long list of ingredients. This soup is a breeze to make, since you basically just dump in all of the ingredients and let the thing simmer for an hour.

Vegetarian Pozole

(Makes a big-ol’ pot that should serve at least 10.  Leftovers freeze well.)

Ingredients:

  • 1 onion, chopped
  • 1 TBSP olive oil
  • 1 29-oz can white hominy
  • 1 4-oz can diced green chiles (hot) (e.g., Hatch brand)
  • 2 small zucchini, quartered and chopped OR 2 chayotes, peeled, seed removed, and chopped
  • 2 cups sliced mushrooms
  • 4 garlic cloves, minced
  • 1 15-oz can diced tomatoes, including the juice (so choose low-sodium, if possible)
  • 1 handful of cilantro, chopped
  • 2 tsp cumin
  • 2 tsp oregano
  • 8 cups broth (chicken or vegetable; low-sodium, if possible; or, 8 tsp bouillon and 8 cups water)
  • Salt to taste
  • To serve:
  • 1 15-oz can kidney beans, rinsed
  • Monterrey jack cheese, shredded OR fresh diced avocado
  • 1 lime (optional)

Directions:

  1. In a large stockpot, sautee onions in olive oil until translucent.
  2. Add all other ingredients EXCEPT for kidney beans and cheese/avocado, bring to a boil, and simmer partially-covered for 1 hour to let flavors blend. Salt to taste.
  3. Before serving, scoop 1/2 cup kidney beans into each serving bowl. Add soup. Squeeze a small fresh wedge of lime into bowl.
  4. Top with a sprinkle of shredded cheese OR diced avocado. Serve.

If you want to heat up leftovers, you may need to add some water before re-heating. This pozole has a tendency to become stewier and stewier after the first round.

Click here to return to Recipe home