pinkstuff1.jpg

Recipes Index

I like to cook. And I'm undaunted by the challenge of cooking for folks with restricted diets for reasons of celiac disease, digestive intolerances or allergies. Some of my favorite recipes are housed here-- feel free to poke around and see what looks good!

Posts tagged Gluten-free
Bill Granger's Corn Fritters (low FODMAP version)
 

This is a recipe I’ve been making for over 20 (!) years, after first tasting them at a restaurant called Bill’s in Sydney Australia. The Bill of Bill’s is Bill Granger, an internationally-loved chef and author of multiple cookbooks, in which different versions of this recipe make cameos. This is a gluten-free, dairy-free and low FODMAP version that I make for potlucks, Friendsgivings and whenever I need a scalable, cheap and easy crowd-pleasing dish to share.


Bill Granger’s Corn Fritters (low FODMAP version)

Ingredients:

  • 1 cup gluten-free 1-to-1 flour (I use Bob’s Red Mill brand)

  • ¼ tsp baking powder

  • ½ tsp sea salt

  • 1 tsp ground coriander

  • ½ tsp ground cumin

  • 1 tsp sweet paprika

  • 1 egg, lightly beaten

  • 1 tsp lemon juice

  • 3 cups frozen corn kernels, thawed

  • 4 spring onions, greens only, thinly sliced

  • 3 tbsp chopped cilantro

  • Olive or canola oil for frying

Directions:

  1. Place the flour, baking powder, salt, coriander, cumin and paprika in a bowl.

  2. Add the egg, lemon juice and 1/2 cup of water and beat to a smooth batter

  3. Add the corn, spring onion and chopped cilantro and stir to combine

  4. Heat the oil in a frying pan over a medium heat and spoon in ~2 heaping TBSP of the mixture for each fritter once oil is hot. Flatten with a spatula and cook for 2 minutes per side until golden and cooked through. Repeat with the remaining mixture.

  5. Taste for salt; sprinkle cooked fritters with additional salt to taste if needed.

While these fritters are deelish all by themselves, you can also serve them alongside a dip or condiment of your choice. In summer, a mango salsa would be lovely. In winter, a creme fraiche might hit the spot. A spicy condiment— a harissa or sriracha mayo— would not be out of place atop these gorgeous golden fritters either.

Click here to return to Recipe home

Strawberry Poppy Muffins (FODMAP friendly)
 

Every June, our family heads upstate to go strawberry picking in picturesque Warwick, NY. And every June, I am faced with an embarrassment of strawberry riches to process while they’re still fresh. This year, I pulled together a delightful recipe for Strawberry Poppy Muffins, with adjustments so they can be sent into school for my kids’ classmates on gluten free/dairy free diets. As with everything I bake, I keep the added sugar on the lower side, so these lovely babies are just sweet enough.


Strawberry Poppy Muffins (FODMAP friendly)

Ingredients:

  • 1 3/4 cups of spelt flour (*contains gluten) OR Bob’s Red Mill Gluten Free 1 to 1 baking flour

  • 1/3 cup rolled oats, plus more for sprinkling on top (use gluten free oats if needed)

  • 1 teaspoon baking powder

  • 1/2 teaspoon baking soda

  • 1 tablespoon poppy seeds

  • 1/2 teaspoon kosher salt

  • 1/3 cup olive oil

  • 1/3 cup maple syrup

  • 2 eggs

  • 1 cup plain Green Valley Creamery lactose free yogurt OR plain/unsweetened coconut milk yogurt (So Delicious brand, dairy-free)

  • 2 teaspoons vanilla extract

  • 2 cups diced ripe strawberries— roughly corresponds to 1 lb of strawberries.

  • To garnish: sugar (white, turbinado, coconut… your choice)

Directions:

  1. Preheat oven to 400 degrees Farenheit. Grease muffin tin with oil spray or butter if not using a non-stick pan.

  2. In a large mixing bowl, combine the spelt or gluten free flour (your choice), 1/3 cup oats, baking powder, baking soda, salt and poppy seeds. Mix to distribute ingredients evenly and set aside.

  3. In a separate medium bowl, combine the oil, maple syrup and eggs, Whisk well with a fork until a bit frothy and well-combined. Then, add the yogurt and vanilla and whisk again until the mixture is smooth, evenly colored pale yellow, and well combined.

  4. Pour the wet mixture into the dry mixture and mix with a large rubber spatula until just combined. Then, add the diced strawberries and gently fold them into the batter until evenly distributed; be sure all the flour is mixed in fully to the batter as you fold. (Don’t worry if this batter looks thicker than your typical muffin mixture; the ripe strawberries will give off some water while the muffins bake, so you don’t want to start off with too wet/thin a batter!)

  5. Divide the batter evenly among your 12 muffin cups. They will be pretty filled to the top.

  6. Sprinkle each muffin top with a pinch of oats and a pinch of sugar. Bake for about 20 minutes (gluten free flour may take a little bit longer to bake than spelt flour). Muffins are ready when they’re a bit golden on top and a toothpick inserted into the center comes out clean.

  7. After removing from oven, allow muffins to cool before removing from tin to store. Seal them in an airtight container and eat within 2 days if storing at room temperature, or freeze them and enjoy them throughout the summer!

Click here to return to Recipe home

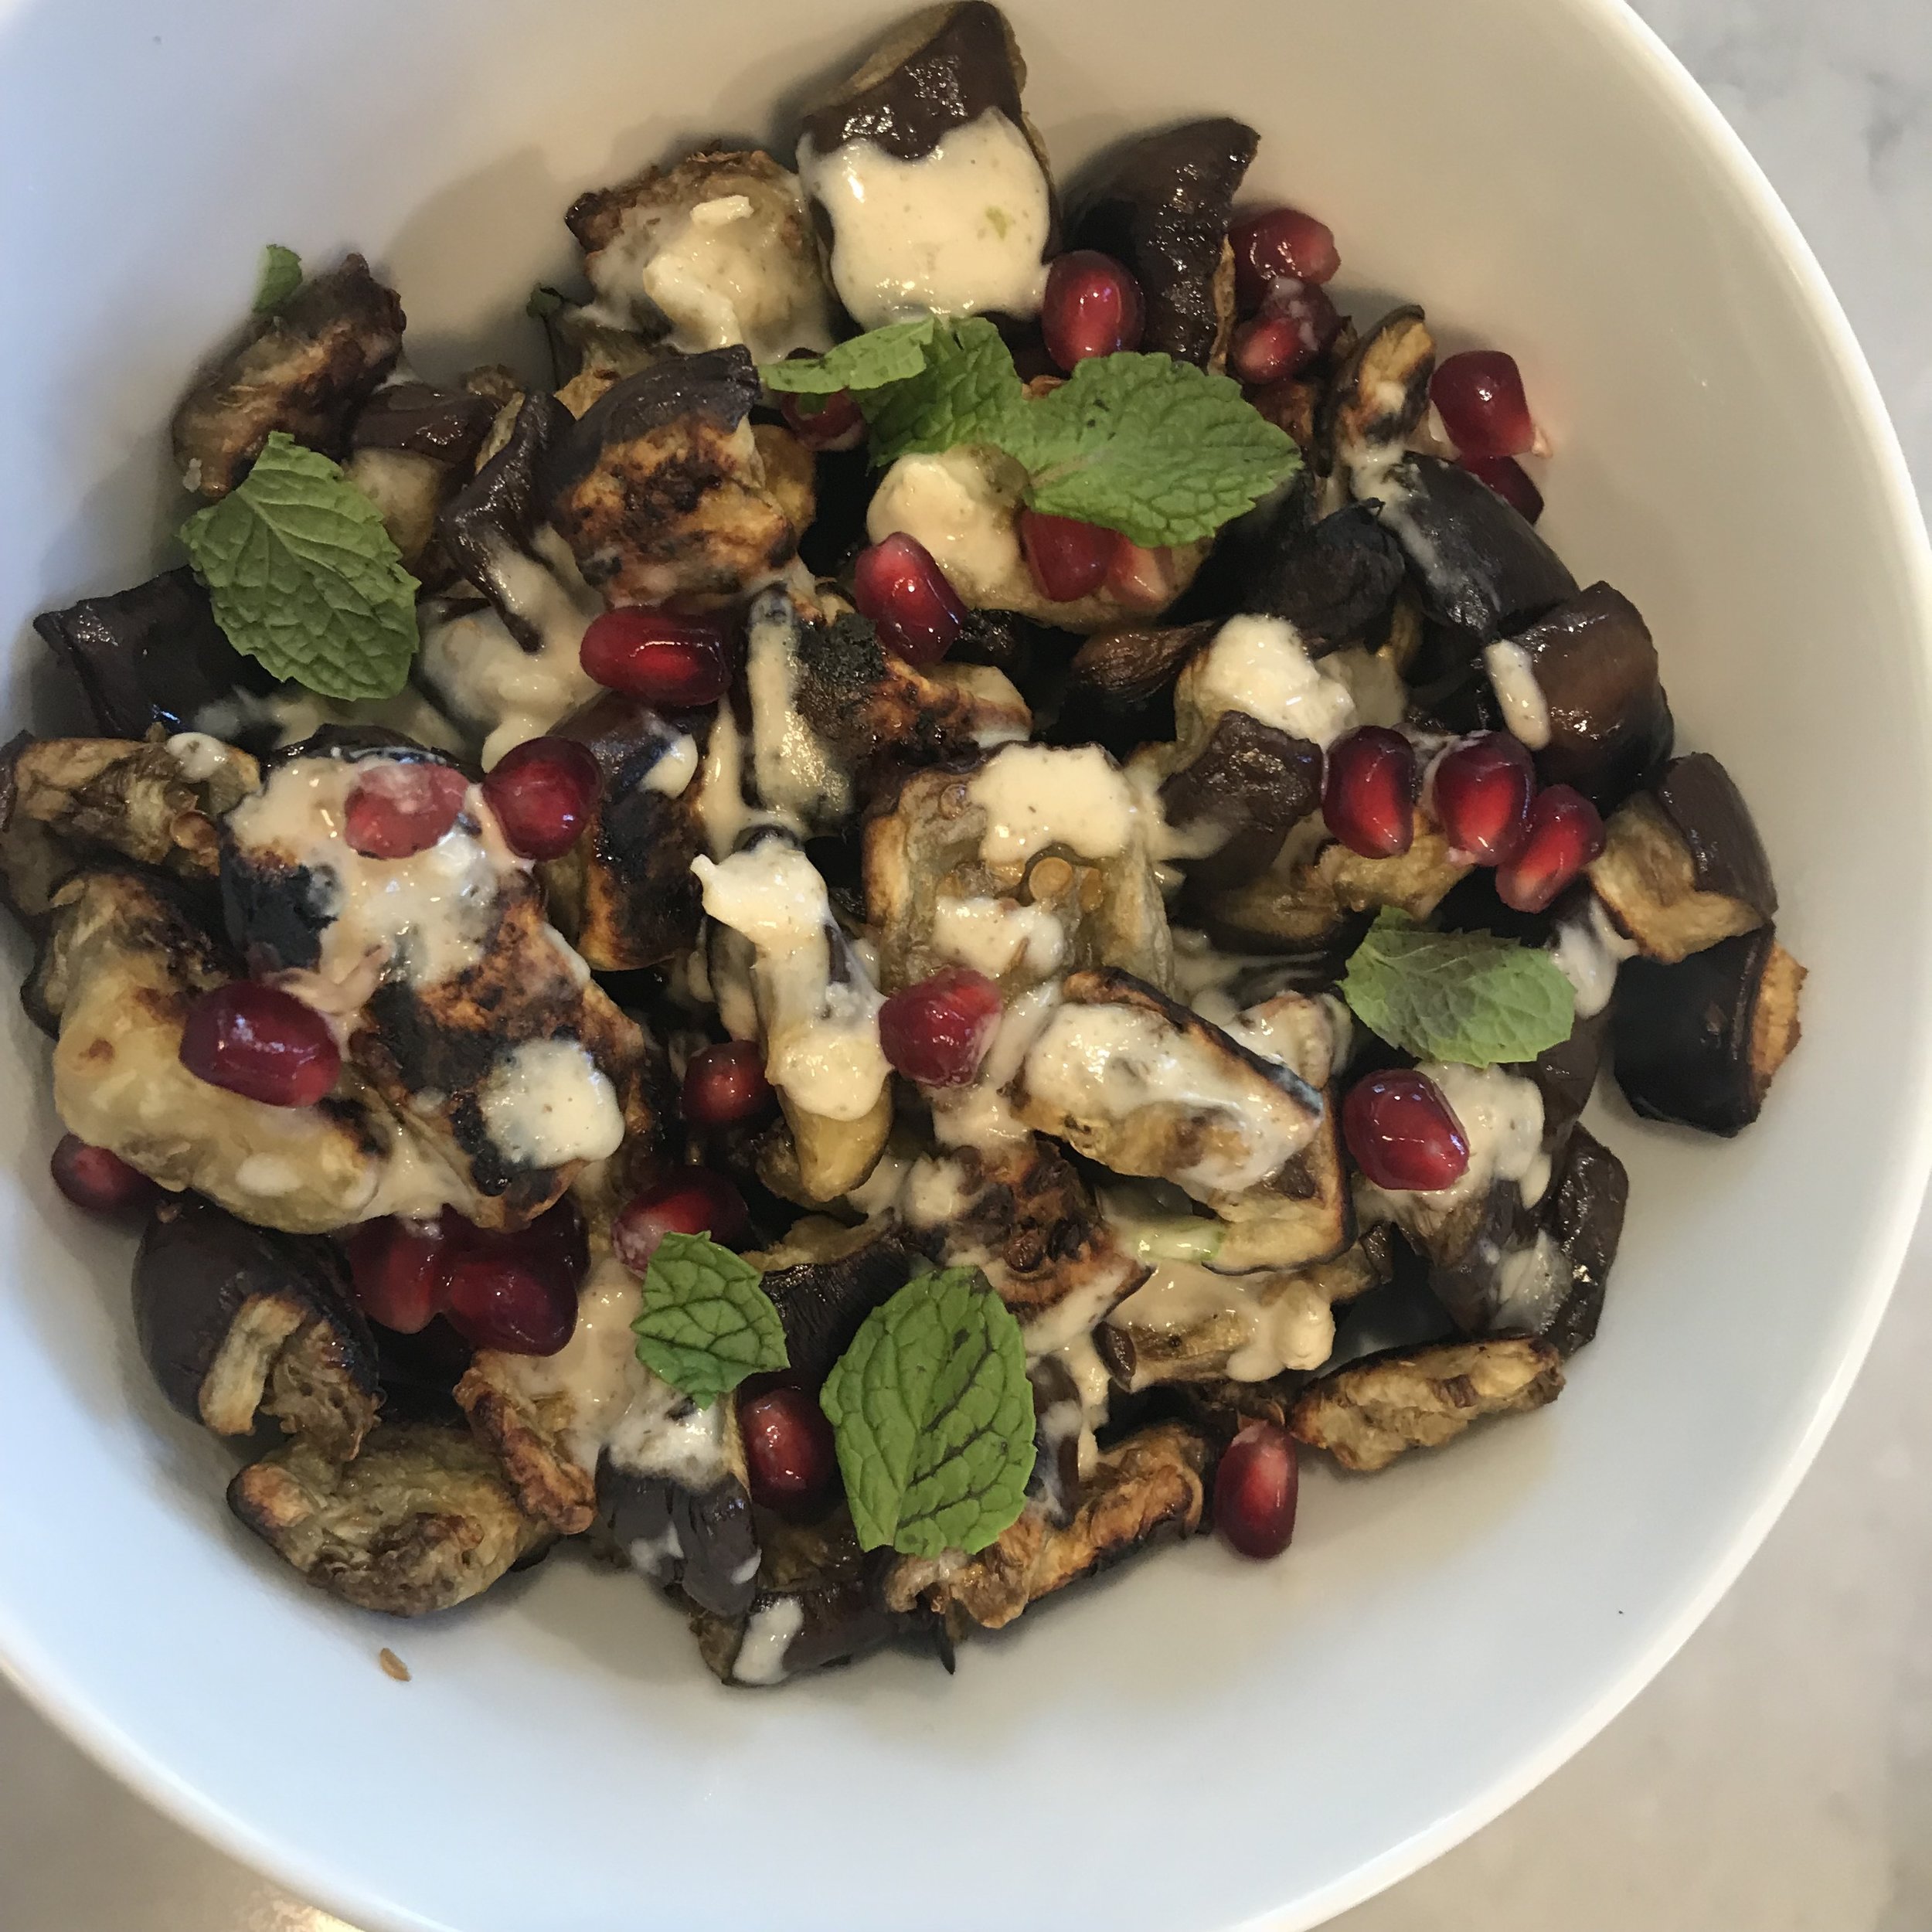
Roasted Eggplant with Tahini and Pomegranate
 

While the rhythms of our social life signal fall, the Farmer's markets and backyard gardens alike are still sending off summery signals, and one of them is a bounty of eggplant.  

I came late to the eggplant game, having decided at some point in childhood or early adulthood that I didn't like it.  It was only after being invited to a dinner party at the home of a vegetarian of Iraqi descent did I realize that I liked eggplant.  A lot. At least, I liked eggplant the way he made it.

This recipe is a little bit inspired by my friend Amos and a little bit inspired by the flavors of the great vegetarian chef, Yotam Ottolenghi.  It's total Mediterranean diet fare, and perfect for this time of year, when eggplants are abundantly available and pomegranates are just starting to show up in the supermarket.

This recipe is naturally gluten-free, dairy-free/vegan and can be easily adjusted to be low FODMAP as described in the directions below,

Roasted Eggplant with Tahini and Pomegranate

Ingredients: 

  • 1 medium/large eggplant
  • Olive oil
  • 1/4 cup tahini paste
  • 1/2 tsp ground cumin
  • 1/4 tsp kosher salt
  • 1 TBSP lemon juice
  • 1 medium garlic clove, minced or crushed (omit to make the recipe low FODMAP)
  • Hot water
  • Garnishes (optional but highly recommended): cilantro, parsley, fresh mint leaves and/or pomegranate seeds***

Directions:

  1.  Pre-heat oven to 425 degrees farenheit and line 2 large baking trays with parchment paper
  2.  Prep eggplant for roasting as follows:
    • Peel if you dislike the skin (or find it difficult to tolerate digestively).  Otherwise, leave the skin on.
    • Cut eggplant into 1" cubes
    • Arrange eggplant cubes on a paper towel lined plate (choose dye-free paper towels), sprinkle lightly with kosher salt, and microwave on high for about 5-8 minutes or until cubes are shriveled to about half their original size. (This will help reduce the eggplant's absorptive capacity so it doesn't sop up all the roasting oil and get greasy.)
  3. Remove the shriveled eggplant from microwave and transfer them to the parchment lined baking trays.  Drizzle enough olive oil on each tray to coat the cubes lightly and toss gently with your hands to disperse the oil evenly.
  4. Roast eggplant in the oven for 14-18 minutes, or until cubes are soft and some have begun to caramelize. (Toss the pieces after 7-8 minutes to help ensure even browning.)
  5. Meanwhile, while the eggplant is roasting, prepare the tahini sauce as follows:
    • Combine tahini paste in a small bowl with the lemon juice, cumin, salt and garlic***  Stir all ingredients to combine.
    • Start adding hot water 1 TBSP at a time, mixing as you go, to thin the the tahini mixture into a drizzly sauce.  
  6. Drizzle tahini sauce on roasted eggplant cubes, top with garnishes and serve.

***Note: To make low FODMAP, omit the garlic.  You can replace it with 1 TBSP garlic infused olive oil for the flavor without the FODMAPs if you wish.  Up to 1/4 cup of pomegranate seeds is considered a low FODMAP serving.  

Click here to return to Recipe home

Butternut Squash Souffle
 

If you thought that the children of dietitians spring forth from the womb with a congenital love of orange vegetables, you would be mistaken.  I've been cooking for my littles for almost seven years, and they've yet to embrace winter squash... with the exception of this recipe for Butternut Squash Souffle, which we call "squash cake" at home for marketing purposes. Yes, it's got added sugar in it, which makes it less righteous than, say, a kale salad. But I surrendered my moral high ground when I traded in my Prius for a minivan. So my kids eat a vegetable that's been enhanced with sugar. Judge me all you want. I think they deserve at least half credit.

Squash souffle a great fall side dish recipe for your Thanksgiving table and holiday potlucks. Leftovers make a lovely brunch base: top with eggs, melted cheese, leftover grilled asparagus spears or anything else you can think of. 

Butternut Squash Souffle

Ingredients: 

  • 20oz cubed butternut squash, steamed until very soft and mashed (or two 10-oz packages of frozen pureed winter squash)
  • 1/2 cup flour of your choice (I use Bob's Red Mill 1 to 1 Gluten-free baking flour; almond flour also works great)
  • 1/4 cup + 1 TBSP sugar (separated)
  • 1/4 cup oil (olive or canola)
  • 3 eggs
  • 1.5 cups milk of your choice (conventional or lactose-free cow's milk and almond work equally well)
  • 2 TBSP cinnamon

Directions: 

  1. Preheat oven to 350 degrees F
  2. Prepare your squash (steam your raw cubes and them mash them into a puree... or defrost the packages of frozen puree) and set aside
  3. Mix together the cinnamon with the 1 TBSP sugar you set aside
  4. In a separate bowl, beat the eggs and then add in flour, 1/4 cup of the sugar, oil and milk.  Beat until well combined.
  5. Add squash to the egg mixture and stir to combine well
  6. Spray a 9 x 13" OR 9" round baking dish with non-stick spray, and pour mixture into baking dish 
  7. Bake for 30 minutes, then remove from oven to sprinkle top with cinnamon/sugar mixture. 
  8. Put back in oven and bake an additional 30 minutes, or until the souffle is set. (It should be firm to the touch in the center; baking time will vary based on size of the baking dish you use)
  9. Remove from oven and let cool for at least 20 minutes before serving.  

NOTE: If you serve it still warm, the souffle will be yummy but have an un-formed souffle/spoonbread type consistency. If you serve it fully cooled (or refrigerate overnight and reheat the next day), you can cut it into squares or wedges and they will hold their shape like a cake; hence the nickname "squash cake."

Serve warm, room temperature or cold.

Click here to return to Recipe home